The Rupture Map: eight bands, one bad idea at a time
The Rupture Map is the spine of Broken Oath: eight danger bands, randomised biomes, weather, Guardians, and a HUD that tells you exactly how much trouble you are in. This page teaches the HUD first, because the HUD is the strategy.
The eight bands, as a schematic
The developer has confirmed the number of bands but not their names or exact thresholds. The wheel below is a navigation diagram, not a screenshot of the in-game map. Use it to think about progression, not to predict a specific level.
| Band | What changes | What to prove before climbing |
|---|---|---|
| I | First steps; tutorial-level pressure | Your main skill can clear a pack without emptying mana |
| II | More pack density | You can move through the map without walking into every fight |
| III | Rares become the threat | You have a plan for a rare with a dangerous modifier |
| IV | Modifiers start to stack | Your defence survives one bad overlap |
| V | Guardian mechanics appear | You can read a phase change and still deal damage |
| VI | The run timer matters | You clear objectives instead of full-clearing |
| VII | Mistakes are run-ending | You have a panic button: flask, guard, dash or logout |
| VIII | Deep endgame | Your build is stable without a lucky drop |
Band names and thresholds are unpublished. The table is a decision framework, not a data table.
How to read the run HUD
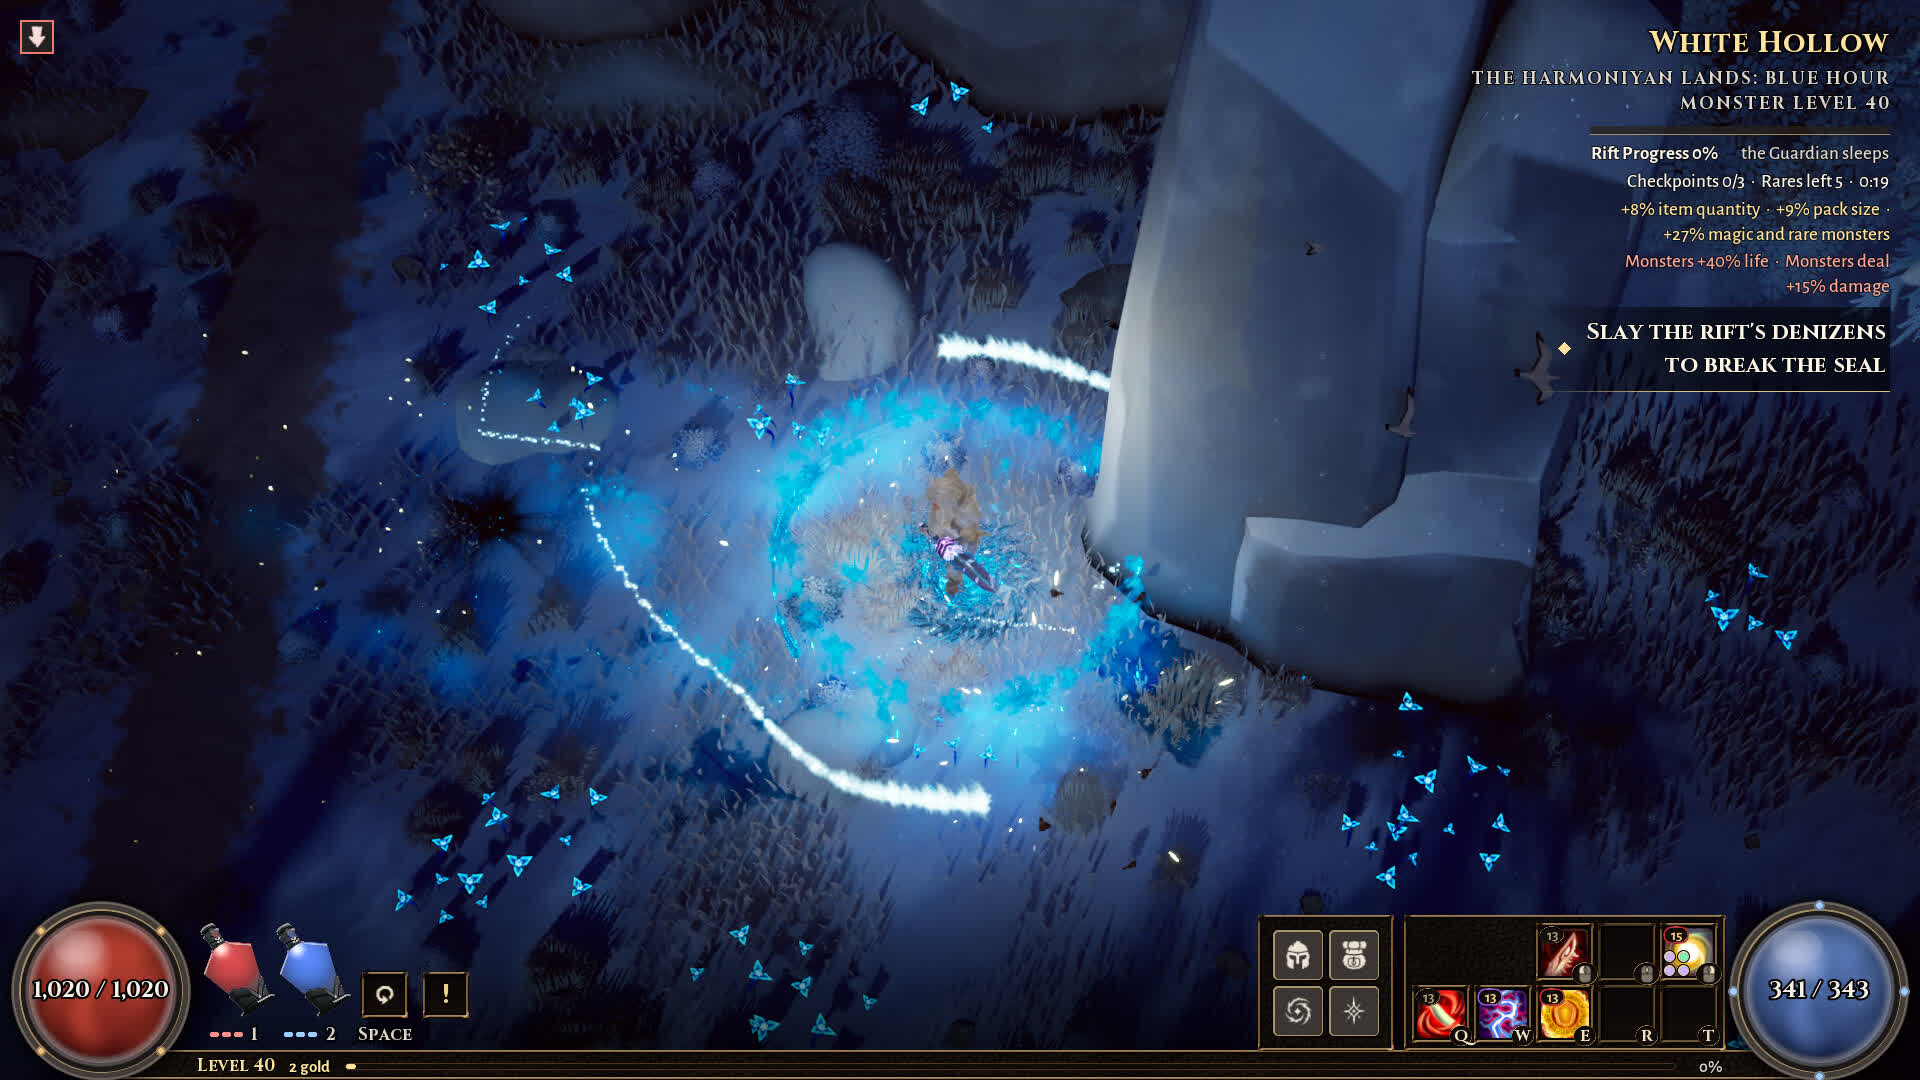
Official screenshots show a right-hand panel with the run’s state. It is dense on purpose. Read it before the first fight, not after the first death.
- Rupture level
- “Rupture Level 70” in the level-70 screenshots. A separate number from your character level. Seen in public footage
- Progress
- “Rupture 80%” / “Rupture 12%” — the seal’s progress toward breaking. Seen in public footage
- Lives
- “Lives 3 of 3” — run-level deaths, not character permadeath. Seen in public footage
- Checkpoints
- “Checkpoints 1/3” — a count, with the exact effect unexplained. Seen in public footage
- Rares left
- “Rares left 3” — remaining rare enemies in the run. Seen in public footage
- Timer
- “1:02”, “1:57”, “0:19” — a run timer. No public statement on whether it is a limit or a score. Seen in public footage
- Objective
- “Kill monsters to break the seal”; “The Ancient Obelisk — not found yet · 60 m north”; “The Cursed Hoard · 45 m west”. Seen in public footage
Rupture level is not a fixed ladder
Official screenshots show Rupture Level 70. The developer’s 6 November news post asks players to push past Rupture Level 150. A creator claims T200 after a tier renumber that made it “old T400+”. That is three different labels for the same progression axis, and it is moving.
The practical rule: compare your own clear speed at a given Rupture level, not the label someone else used. If a patch changes the scale, your old notes are history, not a plan.
Modifiers: the actual difficulty
One official screenshot shows the modifier block clearly. This is the most concrete balance data we have, and it is worth reading closely:
| Modifier | Value | What it pressures |
|---|---|---|
| Item quantity | +8% | Reward, not difficulty |
| Pack size | +9% | More bodies per pack; clear speed and area coverage |
| Magic and rare monsters | +27% | More dangerous affixes; single-target and crowd control |
| Monster life | +40% | Time-to-kill; sustain and mana |
| Monster damage | +15% | Effective health and defensive layers |
From an official store screenshot. Modifiers vary by run; this is one example, not a fixed table.
The design lesson is that difficulty is not one number. A run can be easy on damage and awful on life, or vice versa. Before you enter, decide which of the two your build handles worse. A glass-cannon build can accept +40% life; it should think twice about +15% damage with +27% magic and rare monsters.
A route that respects the HUD
-
Read the objective line
“Kill monsters to break the seal” is a density test. “The Ancient Obelisk — 60 m north” is a navigation test. They demand different movement.
-
Clear toward the objective, not away from it
The progress bar rewards killing; the objective marker tells you where the run wants you. Move in that direction while clearing.
-
Spend lives deliberately
Three lives is a budget. Do not spend one on a rare you could skip; do spend one learning a Guardian phase if the alternative is a wasted run.
-
Bank checkpoints
The HUD tracks checkpoints out of three. Find them. A checkpoint is worth more than a rare drop you cannot carry out.
-
Break the seal, then loot
The seal is the win condition. Loot after the screen is safe; a death with a full inventory is the worst trade in the game.
When to climb a band
- You cleared the current band without using more than one life.
- Your main skill still kills a rare in a reasonable window without a lucky crit.
- You have an answer to the modifier that scares you most.
- You have upgraded one gear slot since the last band.
- You know where the exit or seal objective spawns before you need it.